
Here´s another blog post, this time I´ll be using only 4
vocabulary words for the fruit theme: apple, pear, orange, banana. If there´s a request for more fruit, let me
know and I´ll expand the resources.


Students need to build on the capacity to enjoy reading. This book is to help ELL students understand what they read.

I made a lot of activities to do with the cutouts.
Activity 1: There are big and small fruit cutouts.
Make patterns, by size, by color.Patterns are around us. Children can make up their own patterns, as it is a basic math skill that they might have acquired from thier formal math lesson.
Remind students the basics that a pattern has to be repeated twice.
Teacher: big orange, small orange, big banana, small banana.

Activity 2: Sorting by size. Most children know the difference between big and small.
use the template or draw a similar one on the board and sort all the fruit in big and small. If you need the word little, let me know so I can it to the resource.
Students can also order all the cutouts by size on the board.

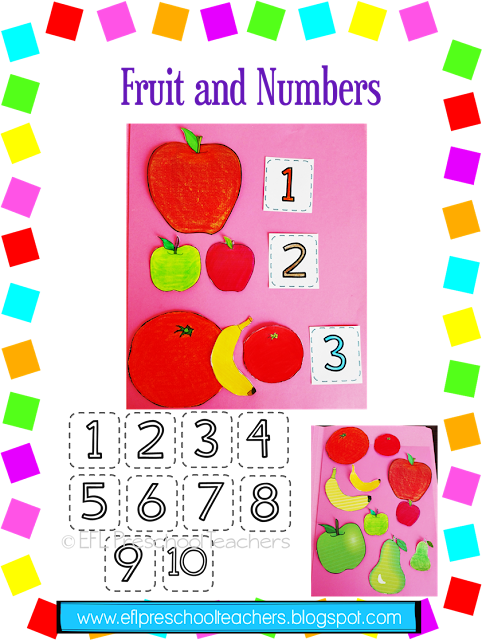
Activity 3: Use the number template 1 to 10 to count all the fruit cutout, make sets of 2, 3,etc.
Activity 4: Puppets can´t be left out of a lesson.
Use them for storytime as you read the book, as flashcards,
Make different voice for each fruit and give them some personality by adding eyes and s smiling or sad mouth.


Here are 4 paper bag puppets to add up to your resources. I will give them away for free, by request at ei98srl@gmail.com. I answer your emails as fast as I can.

Tracing book: I created another book just for tracing and coloring for extra material. I found this lovely penguin at the https://www.themailbox.com and used it as a pointer. They gave it away for free at the newsletter.


Usually worksheets just finish right away after coloring, but what about if they play some flashcards games and then have them cut the flashcards in 4 pieces and glue them on colored paper.

This is mixed worksheet, the first part is just finding the fruit as you name it, have the children count them and color as you indicate. The second part is for the next worksheet, just have children color each fruit as they wish, cut them out and save for the next worksheet.

Use the fruit from the last worksheet, but frist have the children identify and color each shape as they wish. Then have them glue in any place they want. You will then have many diferent combinations in class.
Call on diffferent shape fruit combinations and have the children with them stand up and show to the class.
Teacher: Purple triangle and green apple.

The last one is a baby, students must draw any fruit they want to feed the baby.
Once the class is done.Have them stand up with their worksheet and find another baby eating the same fruit and make a group.
Teacher: The baby is eating a green pear.
Students: Here!!!

There is a fruit and vegetable BUNDLE resource here: https://www.teacherspayteachers.com/Product/Fruit-and-Vegetable-unit-BUNDLE-for-ESL-6800542


Activity 2: Sorting by size. Most children know the difference between big and small.
use the template or draw a similar one on the board and sort all the fruit in big and small. If you need the word little, let me know so I can it to the resource.
Students can also order all the cutouts by size on the board.

Activity 3: Use the number template 1 to 10 to count all the fruit cutout, make sets of 2, 3,etc.

Activity 4: Puppets can´t be left out of a lesson.
Use them for storytime as you read the book, as flashcards,
Make different voice for each fruit and give them some personality by adding eyes and s smiling or sad mouth.

Activity 5: Match the word to the cutout. You can add colors and size if you are working with other children. I´ve seen lots of labeling worksheets around as part of pre writing.


Activity 7: Hide the cutouts around the room.
Name a cutout and students find them.
Teacher:
Find a green apple.
Activity 8: Family Members eat fruit. You can make all the family members.

I grabbed a box of mashed potatoes and glued a white paper and mommy´s face onto it. I cut a slit on the mouth.
Teacher: who´s this ?
Students: Mommy!
Teacher: Mommy´s eating an apple.
What color is the apple ?
Students: Red.
Have students feed Mommy.
Teacher: Give Mommy a banana.
Activity 9: For teaching the concept of like and dislike, I used paper plates and the cutouts.

Activity 10: Shapes!
I made a whole set of shapes using all the colors.
Place the shapes on the board and the fruit/number on each one.
Teacher: yellow triangle.
Students: a big apple.
Teacher: yelow square.
Students: Number 10.

Flashcards are essential for visual learners and if used with games it will appeal to your kinesthestic learners as well.
Giant Flashcards Game: Laminate the
flashcards before you play so they will last for many years Place all
the flashcards in a board game design that you wish on the floor. Leave some
space in between the flashcards to fill
up with colored construction paper. Make groups of 4 to 5 children and give them
a die. Use some alphabet markers, maybe the a for apple, b for banana, p for
pear, o for orange. Once the first
player rolls the die, he/she moves his/her marker that number of spaces and
identify the flashcard. If the player can´t identify the flashcard, he/she must
go back to his/her original point.

Letter art and craft has become so popular now. I made these 4 more to add to the collection. I have the entire A to Z in my TPT store. I´ve added a lot more examples to my Pinterest Page in the Alphabet Board.


Fruit and Vegetables Worksheets

Usually worksheets just finish right away after coloring, but what about if they play some flashcards games and then have them cut the flashcards in 4 pieces and glue them on colored paper.


Use the fruit from the last worksheet, but frist have the children identify and color each shape as they wish. Then have them glue in any place they want. You will then have many diferent combinations in class.
Call on diffferent shape fruit combinations and have the children with them stand up and show to the class.
Teacher: Purple triangle and green apple.

The last one is a baby, students must draw any fruit they want to feed the baby.
Once the class is done.Have them stand up with their worksheet and find another baby eating the same fruit and make a group.
Teacher: The baby is eating a green pear.
Students: Here!!!

Please follow me! leave your comments and requests!
No comments:
Post a Comment
Note: Only a member of this blog may post a comment.